To Do
✅ python을 활용한 ABAQUS .odb 결과 파일 분석
ABAQUS로 구조해석을 하고 나면, 해석을 돌리기 전 지정한 field output 혹은 history output 결과가 .odb 파일 형식으로 출력된다. 요소(element) 숫자가 굉장히 많고 해당 스텝(step)을 마무리하기 위한 프레임(frame)이 많이 있다면, 결과 파일의 용량도 커지고 프로그램 상에서 분석하기가 쉽지 않다.
정해진 메쉬(mesh)이고 하중/경계 조건(load/boundary condition)만 달리하면서 보고자 하는 노드/요소(node/element)가 정해져 있다면 set을 지정하고 그에 해당하는 결과만을 뽑을 수도 있지만, 정해진게 있지 않고 많은 불확실성을 내포하고 있는 모델이라면 특정 조건에 해당하는 결과들을 뽑아 낼 수 있어야 한다.
이 포스트에서는 .odb 파일의 구조가 어떻게 되어있는지 간단하게 살펴보고 파이썬(python)을 활용하면 어떻게 자동화가 가능한지 알아본다.
.odb 파일 구조
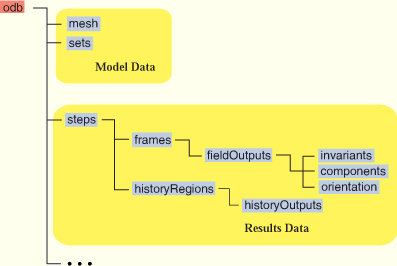
아바쿠스 공식 document에 따르면 .odb 파일은 다음의 구조를 가진다.

해석 결과는 크게 두 가지로 나뉜다.
- Field output
- History output
이번 포스트에서는 History output에 대해서는 간략하게 다루고 Field output에서 나오는 결과 파일을 다뤄보도록 한다.
Python
단계적으로 print 함수를 써가면서 봤을 때, 해당 키와 객체 혹은 해당 키와 값으로 자료 구조가 이루어져 있음을 확인했다.
[ Field output ]
나는 해석 결과는 Field output에서 뽑으면서 진행했는데, 순서대로 원했던 결과는 다음과 같다:
- 최종 frame에서 어떤 element가 최대 응력을 가지는지?
- 인접한 element에 대해서도 응력 값 가져오기
- 결과값 텍스트 파일 출력 - 각 frame에서 원하는 element의 stress 값을 출력
원하는 걸 얻는데 코드 몇 줄 필요하지 않다.
위에서 1번 결과를 도출할 수 있는 코드는 다음과 같다. 2번 결과는 내가 어떻게 element를 형성했는지에 따라 다른 부분이기 때문에 여기서는 따로 다루지는 않겠다. 자신이 직접 만든 균일한 메쉬(mesh)이면, 요소 번호 간 간격이 동일할 것이기 때문에 그 부분을 생각하면서 파악하면 될 듯하다.
import sys, glob, os
from odbAccess import *
from types import IntType

#Open .odb file
odb = openOdb('파일명.odb', readOnly=True)

#Get step and frame
step = odb.steps['Step-1']
frame = step.frames[-1] # index -1: 마지막 프레임

#Get stress values
stressField = frame.fieldOutputs['S']
stressValues = stressField.getSubset(region=odb.rootAssembly.instances.values()[0]).values

#Find element having the maximum stress
stressList = [] # create empty list
for stress in stressValues:
	stressList.append(stress.mises)

ind = stressList.index(max(stressList)) # index가 0부터 시작하므로 ind+1이 내가 원하는 번호
[ History output ]
history output 결과는 다음과 같은 키워드로 접근이 가능하니 참고하자.
"""
자신이 지정했던 history output 순서대로 인덱싱이 가능.
예를들어, history output1의 경우 0번 index로 접근.

Outputs keywords:
    1. RF - Reaction force ex) RF1, RF2, RF3
    2. U - Displacment ex) U1, U2, U3
    3. S - Stress ex) S11, S22, S33, S12, S13, S23
"""

hist1 = step.historyRegions[step.historyRegions.keys()[0]]
data = hist1.historyOutputs['RF2'].data # 해석 전 지정했던 키워드에 대해서만 접근 가능
그럼 마지막으로 내가 원하는 element에서의 frame별 응력(stress)값을 텍스트 파일 형태로 내보내보자. 원하는 요소 번호를 ind 변수에 저장했으니 이를 이용하면 된다.
for frame in step.frames:
    stressField = frame.fieldOutputs['S']
    stressValues = stressField.getSubset(region=odb.rootAssembly.instances.values()[0]).values
    print (frame.frameValue, stressValues[ind].mises)
챗GPT는 어떻게 짤까?
글쎄 이것 또한 챗GPT에 안물어볼 수가 없다. 다음의 질문을 던졌고 어떤 답변이 왔는지 확인해보자.
Python code on analyzing ABAQUS .odb file to find the element having the maximum stress.
답변은 다음과 같다:
To analyze an ABAQUS .odb file and find the element with the maximum stress, you can use the `abaqus` package in Python. Here's an example code that demonstrates this:
from abaqus import *
from abaqusConstants import *

# Open the .odb file
odb = openOdb('path/to/your/odb/file.odb')

# Get the first step and frame in the .odb file
step = odb.steps.values()[0]
frame = step.frames[-1]

# Get the stress data for all elements in the frame
stressField = frame.fieldOutputs['S']
stressValues = stressField.getSubset(region=step.instances.values()[0]).values

# Find the element with maximum stress
maxStress = -float('inf')
maxStressElement = None

for stressValue in stressValues:
    if stressValue.mises > maxStress:
        maxStress = stressValue.mises
        maxStressElement = stressValue.elementLabel

print("Maximum stress value:", maxStress)
print("Element with maximum stress:", maxStressElement)

# Close the .odb file
odb.close()
Make sure to replace `'path/to/your/odb/file.odb'` with the actual path to your ABAQUS .odb file. This code assumes that the stress output variable is named 'S' and the stress measure is von Mises stress ('mises'). Modify these names if necessary based on your specific ABAQUS setup.
Note that you need to have the ABAQUS Python environment set up to run this code successfully. Additionally, ensure that you have the `abaqus` Python package installed, which is typically included with the ABAQUS installation.
잘 돌아가는지 확인해봤는데 stressValues를 가져오는 과정에서 input인 step.instance가 문제가 된다. instances라는 attribute가 없다는 오류가 나온다. 뭔가 line by line으로 읽어보면 되게 그럴 듯 한데 안돌아가는 line은 일부 수정해줘야 한다. 꼬리에 꼬리를 물어 'ABAQUS가 step은 instance attribute가 없다는데?'라고 질문을 다시 해보니 odb.rootAssembly.instances.values()[0]로 바꿔 보래서 바꿔 진행해봤다. 즉, 아래와 같이 변수를 대체했다:
stressValues = stressField.getSubset(region=odb.rootAssembly.instances.values()[0]).values
이 라인만 바꿔주니 원활하게 잘 돌아간다. 내가 얻었던 element 번호 그리고 maximum stress를 동일하게 출력(print)해주는 것을 확인했다. 내가 짰던 코드와 비교를 해본다면 훨씬 간결하고 효율적이긴 한 것 같다. 나 같은 경우는 무식하게 리스트에 다 넣어서 max 함수를 통해서 얻었다면, chatGPT의 경우 .odb 자료 구조를 잘 활용해서 동일한 결과를 얻었다.
아직까지는 챗GPT가 제안한다고 해서 다되고 다 맞는 말은 아니다. 안돌아가면 꼬리에 꼬리를 물면서 돌아가는지 확인할 필요가 있다. 너무 맹신하지는 말고 적절히 내가 짠 코드랑 섞어서 쓸 수 있다면 조금 더 깔끔한 코드를 작성할 수 있을 것 같다. 아직은 내가 원하는 것을 한방에 짜주는 세계는 오지 않은 것 같다. 내가 좀 더 분발하는 수 밖에...!
